Hey, I'm Tye with Palmetto State Armory. Thanks for joining us in another video in our how-to series. Today, Hank is going to show us how to swap out our front sight, post, and handguard for a low-profile gas block and free float rail on an AR-15.
So these are the tools you need to swap out the front side. We've got an upper vice block, bench block, punch set.
Parts List:
- AR-15 Low-profile gas block
- Gas tube roll pin
- Crush Washer
- AR-15 Gas Tube - Carbine Length
- PSA Custom AR-15 custom handguard
Tools List:
- Screwdriver
- Hammer
- AR-15 Armorer’s Tool
- AR-15 Bench Block
- Standard drive punch set
We've got a screwdriver with a bit, hammer, and AR 15 tool. So in this scenario, to change out this front sight post, these are the things that you'll need in order to replace your set up here; you're going to need a low-profile gas block, gas tube roll pin, crush washer, gas tube. And in this particular scenario, we chose this PSA custom handguard.
Step 1: Taking Apart the Upper Receiver [01:05]
So the next thing we need to do here is to start taking this upper apart. And, we don't really need tools for the first part of it. I'm going to start by taking out the bolt carrier group and the charging handle. All right. So to remove the handguard, we don't really need any tools. You just need to put some downward pressure on the Delta ring and start by taking out the lower part.
All right, we'll just get this side out. So for the next part, we're going to need to put the upper into a vice.
So next, we need to remove the muzzle device. And for that, we need our AR tool.
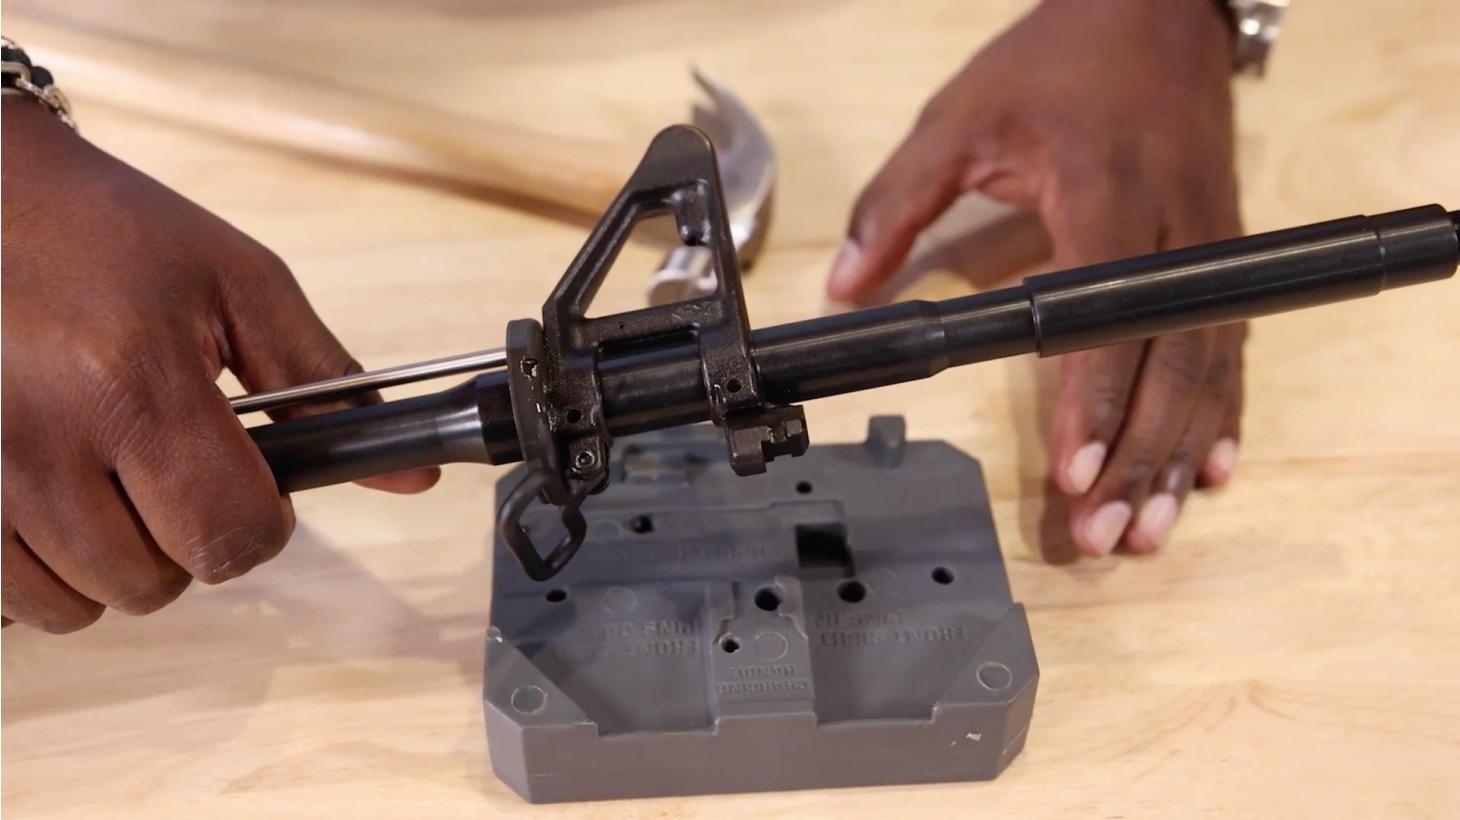
And for now, we're just going to set these aside next. We're going to need to take the upper out of this vice and put it onto a bench block.
So just for your frame of reference. So you know that you're driving these pins out the right way. If you actually look at the tool here, it tells you which way you need to be facing. Uh, you want to use that. I don't always expect this to go smoothly. You might want to hit these pins with a little bit of penetrating oil to get them out.
All right. So those pins are out of there. Now, here you go. All right. So let's get that vice block back out here because we're going to need to get this on the vice.
All right. Now you can take out some of your aggression.
Next, we need to remove this barrel nut. So we'll need our AR armorer's tool out here.
Step 2: Installing the Barrel Nut [03:46]
So next, we're going to install the barrel nut onto this upper for that, we need to go into the box that the handguard comes in. I'm going to open this up here. Show you guys. There's the handguard and here we have the barrel nut and the screws that it comes with. Next, we're going to put on the barrel nut in this application, the square end goes facing out as it goes onto the barrel. And while I'm hand tightening this, I want to remind you guys that PSA recommends that you torque this down to 45-foot pounds.
Remember to check on your box because every manufacturer has different applications for the barrel nut and the handguard.
Step 3: Installing the Gas Tube and Gas Block [04:17]
Now you will need a gas tube, low profile gas block, the punch for that, and a screwdriver with a bit on it. We want to put the gas tube into the gas block here with the hole pointing down and line up the pinhole.
And we're going to use our bench block here in order to put this together. I'm also going to get out the tiny pin for that. So we're going to use our roll punch holder to get this started.
Before you drive this pin all the way home. You want to make sure your gas port on the tube is facing down and that the pinholes are lined up. So before you install your gas block or tube, you want to make sure the set screws are loose enough for you to get it onto the barrel. Then you want to tighten them up.
At this point, you want to check the alignment of your gas tube to make sure that it is straight.
Step 4: Free Float Handguard Installation [05:25]
Next, we're going to slide on the handguard. There are two tabs on here that help you to align it perfectly. We just want to run that over and you may have to tap this down a little bit to get it, to sit properly.
Now we're going to get those screws in here. There are three of them that go right here.
We'll put those in and tighten them down.
Once you have those in, there is one final set screw that goes in here, and we're gonna use our Allen key for.
So at this point, we're going to put back on our flash hider. If you want to, you could put on any muzzle device that you so desire; either way, you're going to want to change your crush washer. And when you put that on, you always want the cup out or face.
For the timing of this, you want the ports facing up, and PSA recommends talking this down to 20 foot-pounds. So there you go. Now you have a brand new upper.
For a complete parts and tools list, see the description below. If you have any questions, hit us up in the comments section.